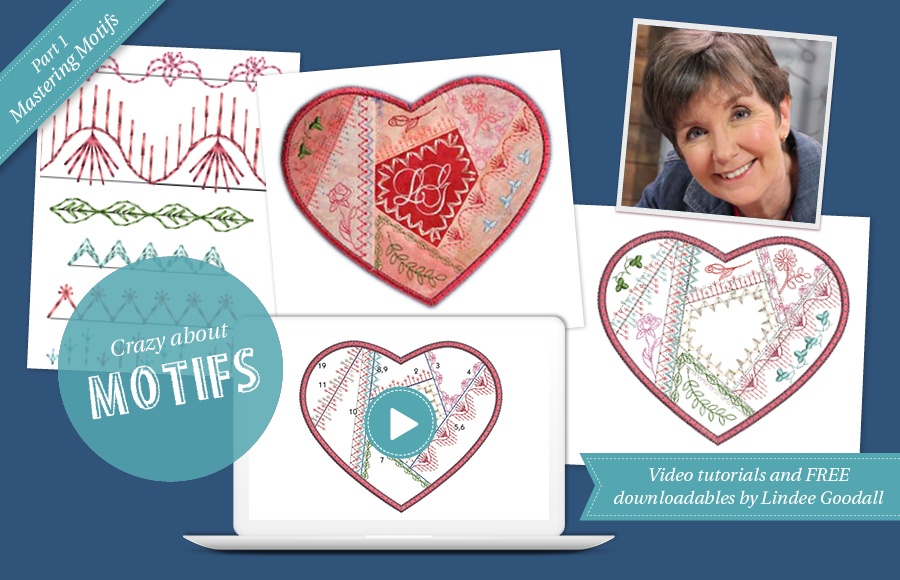
Learn about how to create an ITH Crazy Patch and new Motifs and then how to apply them
The first time I was aware of embroidery machines was at a computer swap meet at the Cincinnati Mac Users Group in 1992. A member had a small curious machine that resembled an oversized stapler that he said did embroidery.
He had no sew-outs and when I heard “embroidery” my only reference was hand embroidery. I remember thinking “how do you possibly sew a lazy daisy stitch on a sewing machine?”
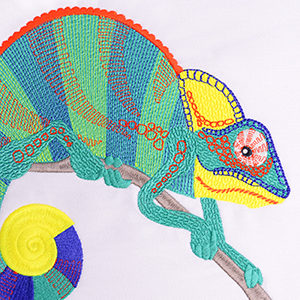
Well, you can’t really. We still can’t make a true lazy daisy stitch but it’s possible to make machine versions of many stitches used in traditional hand embroidery with motif stitches. Fortunately, Hatch lets us make our own motifs and store them in libraries so the possibilities are limitless.
Once created, a motif can be applied to lines or filled objects and can be used as stamps to place a single motif or “carve” into another fill. They’re really incredibly versatile and, in my opinion, under-used.
Generally, going too crazy with an over abundance of patterns in a single design violates the principals of good design and just creates chaos.
Victorian Crazy Patch is one of those cases where violating those rules is actually encouraged. It therefore provides an excellent opportunity to experiment with motif runs and stamps.
Recreating Crazy Patch
Since I started hand sewing before I ever went to school, I’ve done a lot of hand embroidery. Now I enjoy recreating those techniques on the embroidery machine.
While still not what you’d call a production friendly process, it is possible to do crazy patch entirely in the hoop and even with all the fuss, it’s way faster than doing it by hand.
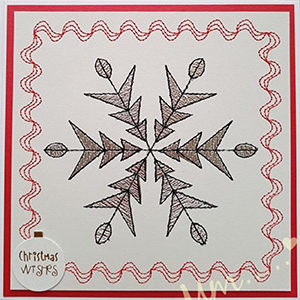
I’ve created a whole set of crazy patch designs, two of which can be seen incorporated into these journal covers.
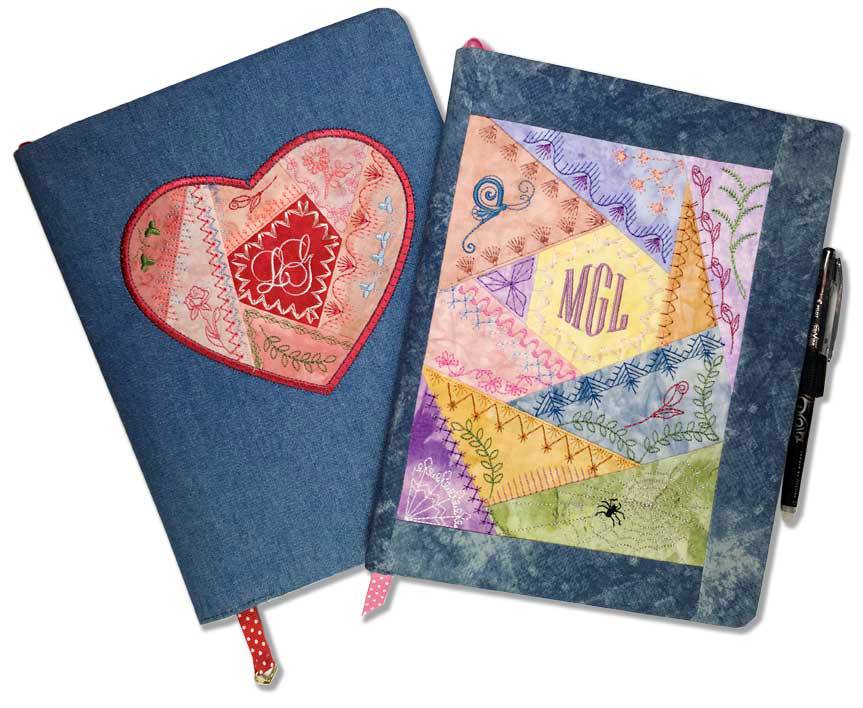
The heart is completed as an appliqué while the rest of the designs in the set are blocks for more traditional quilting projects that are designed for piecing together.
The download at the bottom of this post includes two versions of the heart (with and without the motifs), a PDF template for piecing, and a custom motif library.
This post focuses on mastering motifs. Next week’s post will cover making the journal cover.
Simulating crazy patch can be separated into two parts: the piecing bit and then the embellishing. If you’ve ever done paper piecing with the sewing machine, the piecing process will feel quite familiar.
Rather than focus on how to do that, let’s skip to the “icing”—all those fun decorative stitches. This is the part that’s easy but potentially time consuming. All those choices!
Installing the Crazy Quilt Motif Library
To use the included motifs, you’ll need to download, extract and move Crazy Qlt.esa to the C:\Program Files (x86)\Wilcom\Hatch Embroidery Software V1\USERLETW folder
Mastering Motifs
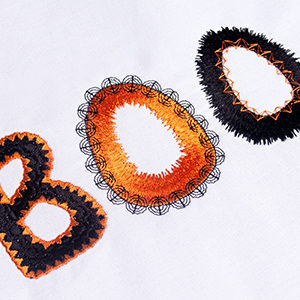
If you haven’t played with motifs yet, they are small, single color elements that can be repeated along a line or to fill an object with a pattern. Think of the decorative stitches on any sewing machine and you’ll have a good idea.
The motifs in the in Crazy Quilt library are mostly triple stitched to get a bolder look reminiscent of embroidery floss and are therefore intended for line objects. This doesn’t mean you can’t use them as fills but it will run up your stitch count excessively.
Although I’ve included all the motifs I used in this heart, you may want to create some of your own. Be forewarned, you can become quite addicted to creating motifs!
Some guidelines for making motifs:
• Motifs for fills or runs should be one color for maximum efficiency.
• Turn off auto trims on objects in the motif. They can be added to the line or fill object.
• Motifs can be composed of multiple objects. When later applied to an object, you’ll only see one object in the Resequence docker. When added individually via the Motif Stamp tool, it’s inserted the way it was created.
• Before you go crazy making motifs, make a couple and test them. Watch them in the stitch player and then sew them out.
• To rename or delete individual motifs or categories go to Software Settings Menu > Manage Motifs.
• Keep the names short and develop some sort of key. In the included library, “CQ” is for crazy quilt, “F” for feather, and “Flo” for floral.
Good sources of ideas for motif stitches can be found built in to most any sewing machine. Pinterest is also a great resource if you search “crazy quilt” and “blackwork.” I’ve been making motifs since 1993, so I have quite a stash of them; they just aren’t all “Hatched” yet.
Motif Making Basics
Making motifs in Hatch is pretty easy once you know how and there are a few little tricks. Because it’s easier to see how it’s done rather than read about, I’ve made this video:
Apply Motifs
I’ve provided the design crazy patch design but all the motifs have been converted back to runs. You’ll have to reapply the motifs. You don’t have to draw anything, only select a line, apply the motif and select a color. Or, get creative and change them up!
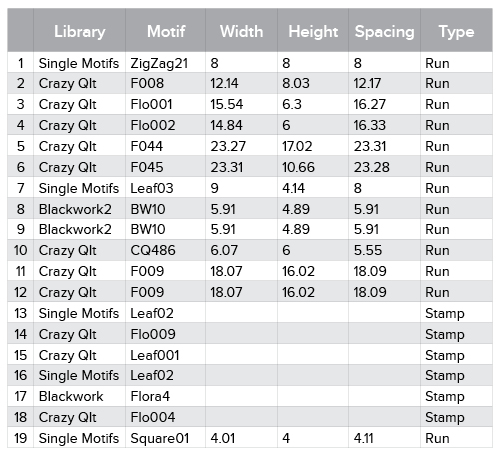
The motifs can be applied in most any order. I customarily add them after the piecing is done and follow the same order as I did for piecing. Here’s a chart of the motifs I used and the settings I used:
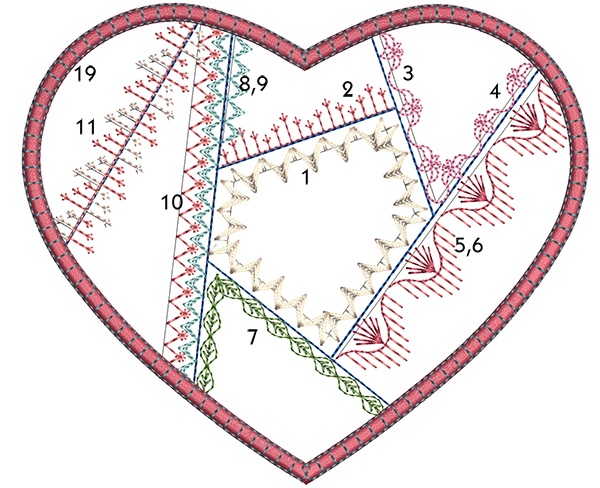
There won’t be any place markers for the motif stamps, only for the line objects.
For the final motif, duplicate the satin border and apply Single Motifs > Square01 at the default settings.
Here’s a visual guide for the motifs:
The motif stamps are placed individually and rotated and resized as desired. I went for a very busy look but you may choose to omit those elements, choose different ones or add other designs from your stash.
Feel free to experiment with motifs. It’s fun to nest or interlock different motifs.
Be sure to check motif stamps to make sure there are tie-offs on the first and last object in a motif stamp; they aren’t likely to have any applied automatically.
Once again, here’s a visual guide:
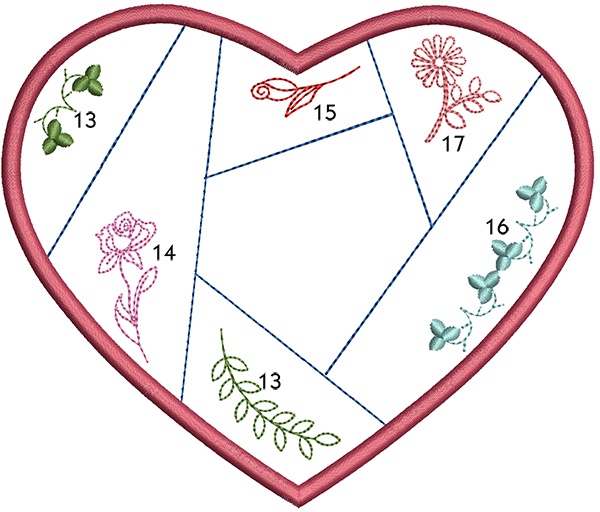
I stamped the Single Motifs > Leaf02 and then edited them. I suggest you refer to the image and give a try for yourself (working in a separate document makes it easier). As a convenience, I’ve provided my combined and edited version in the Crazy Qlt motifs library.
I usually apply a different color to every motif and then mix and match colors depending on my fabrics. There’s no reason why you couldn’t use just one or only a small set of colors. It really depends on your fabric selections and your preferences.
This is the type of design I actually prefer stitching on my single needle machines. The machine will stop after every color change and it gives me a chance to choose colors on the fly rather than trying to figure out everything in advance.
I’ve added a monogram to my design to fill the center. Feel free to add your own or maybe just use a feature fabric here.
Rather watch this process? Here it is:
Expand on This Design!
I’ve sized this design to fit a 5×7” hoop. If you have a larger one, consider adding additional motifs around the heart border to give it a lacey edge.
Incorporating motifs into your designs adds interest, texture and makes them unique. And the best thing about motifs and Hatch is that you can add your own and store them for future use.
Motifs are also “lighter weight” and work well on dense fabrics where a fully fill stitched design may cause too much distortion.
Try enlarging them and using a heavier thread. You can also get some interesting shaded effects with variegated threads that look more like stripes in satins and fills.

Please note: You will need to sign in or register a free account to be able to download the free design.
Once you registered an account, you will have unlimited access to ALL the free designs that are currently on the Hatch Embroidery website and future ones two. You will also automatically receive our newsletter about free projects and designs. You will NOT be requested to download the software. Having an account does not come with any obligations to you at all.
Lindee Goodall has been digitizing since 1994 and was the founder of Cactus Punch. Currently she is a solopreneur, creating designs, blog posts, YouTube videos, and other content for avid embroiderers.
See more here LindeeGEmbroidery.com
Did you enjoy this article? Please leave a comment below, we’d love to hear your feedback.
Hatch Embroidery software products are in popular use in over 100 countries. It is time to join the global trend and give Hatch a try! The 30-day Free Trial grants you unlimited use of all the amazing features and the 30-day Money Back Guarantee ensures that there is absolutely no risk involved.