Creating Breast Cancer Awareness Ribbons with Hatch Embroidery – FREE Designs

For beginners and advanced Hatch users. See our video tutorials on special embroidery effects!

Did you know that breast cancer is the most common cancer and the second leading cause of cancer death among women worldwide?

October is all about raising awareness and funds. We wanted to get involved by creating variations on the pink ribbon design that can be used to show your support for anyone who might be battling with the disease. This week we want to share several versions of the Breast Cancer Awareness Ribbon using a basic ribbon design and Hatch Embroidery Software. The projects you can make for loved ones are endless!

You will find a button at the end of this article to access your 5 FREE pink ribbon designs.

Beginner user:

If you are a beginner in the software, you can easily open the designs, set up your machine and hoop and resize the design. You can save it to an .EMB file format and then export to your required machine file format.

Intermediate user:

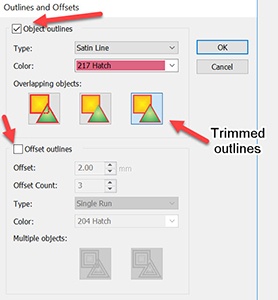
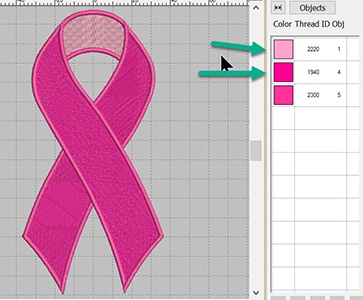
If you have been playing around with the software and its many features, you will want to start with the basic designs and use the Hatch Software features and stitch types to create your own ribbon.

Advanced user:

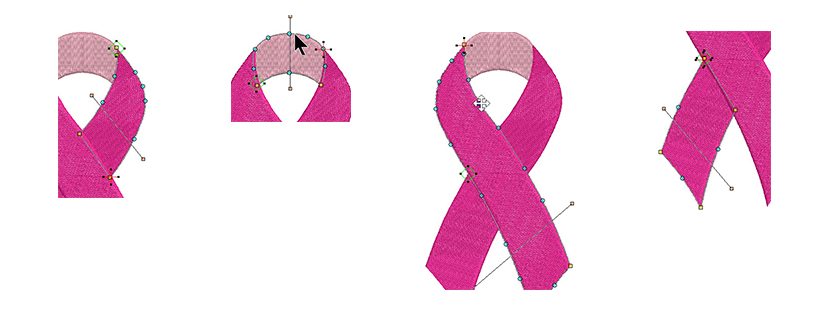
If you have ventured out into manual digitizing, you can use the included artwork to create your own design.

Hatch Tip: In several of the designs we have used the Open Shape tool with single run stitches to create “pathing” between objects to prevent extra jumps. You do not have to do this if you have a machine with automatic trims, but it does help. It’s entirely up to you.

1. Basic Ribbon Using the Close Shape Tool

We manually digitized this design using the Close Shape tool. We then used the Reshape tool to change the stitch angles, so that it looks like the ribbon is turning. To reshape an object select the object (hotkey = O), press the Reshape key (hotkey = H) and then change your stitch angle to the direction you want the stitches to flow.

2. Ribbon Using the Outlines and Offset Feature

For this design we used the Outlines and Offset feature in the Hatch software to create an outline around the design.

Click on the Edit Objects Toolbox, then click ‘Outlines and Offsets’. The dialog box will open. Check ‘Object Outlines’, then select ‘Satin Line’ and desired color. Click on Trimmed Outlines (the 3rd box, see image).

Important: Be sure to uncheck the ‘Offset outlines’ box!

Hatch Tip: If you do not see your desired color in the drop down, just select any color. You can change the color back in your design palette later.

3. Ribbon With Outlines Only

For this design we only want an outline, so there is no need to re-digitize it in the Hatch software!  


Start with the design with the outline you just created (02_manual w-outline.EMB). Open the design in your software. Open the Resequence Docker, then click on the “colors” button if you do not see the color list.

Select the first two colors if you are using the previous design, then press the “delete” key on your keyboard. Rename your design and save it to .EMB and then export to your desired machine format. It’s so easy with Hatch Embroidery software!

4. Ribbon Using the Knife Tool For Advanced Users

For this design we used the Knife tool to split the design. Here is a video showing how to use this tool. 

Once you have split the design, use the Open Shape Manual Digitizing tool and digitize the straight bars using a satin stitch. Add lettering of choice.

See video on Using the Knife tool in Hatch Embroidery software here: 

Hatch Tip: Experiment with the Alignment tools!

5. Ribbon with Tatami Fill Stitches

In this design we used the special effects with Tatami Fill stitches. For the filled part of the design, experiment with different fill types.  For this example, we used the Tatami Fill stitch #27 and #28. We also used the Florentine Stitch Effect to change the stitch angles to appear as if they are curving.

See video on using the Florentine Stitch Effect in Hatch Embroidery software here:

You can get really creative with the free breast cancer awareness designs. We created a couple of designs below for inspiration.

Key-fob design:

Please note: You will need to sign in or register a free account to be able to download the free design.

Once you registered an account, you will have unlimited access to ALL the free designs that are currently on the Hatch Embroidery website and future ones two. You will also automatically receive our newsletter about free projects and designs. You will NOT be requested to download the software. Having an account does not come with any obligations to you at all.

Hatch Embroidery software products are in popular use in over 100 countries. It is time to join the global trend and give Hatch a try! The 30-day Free Trial grants you unlimited use of all the amazing features and the 30-day Money Back Guarantee ensures that there is absolutely no risk involved.

Let us know in a comment below how useful you found this article and please do share your embroidery on our Facebook page. We love to see your work!